Wednesday, October 23, 2013

Illustrator visits Thomas!

Recently, students at Thomas were lucky enough to be able to host illustrator/author Steve Harpster. Steve is a local illustrator who does free (can you believe that?!?) school visits in Ohio and free electronic visits around the world. He has illustrated over 100 books including many how to draw books. Steve sent several of his books in advance and my students couldn't wait to see him. 
Steve's presentation was primarily a drawing lesson. He drew many characters from his books. Students (who brought paper and pencil) drew right along with him. Watching 125 students all drawing something at once was priceless. It was the art version of watching a crowd at a tennis match. Everyone would look up at the screen to see the next step in the drawing. Then they would all look down to work on their own paper. Then the would look up, then down, then up, then down, then up, then down. I think you get the point. 

Pure fascination.
Steve drew on his tablet which was projected on the wall.
It was incredibly easy for all students to follow along.
My students were extremely engaged with the presentation and were incredibly excited and motivated about how good their drawings were. All of the drawings are based around letters or numbers, so it's a totally different style than what they typically see in drawing books. I saw more successful drawings with Steve's presentation and books than I've ever seen from any other drawing book. 

If you're interested in having Steve Harpster visit your school, I would highly recommend it. More information about his school visits (along with drawing lessons, printables, and other materials) are on his website.

Tuesday, October 22, 2013

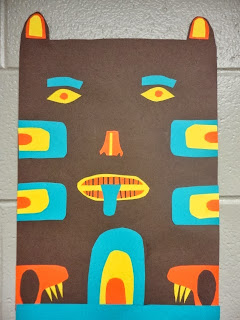
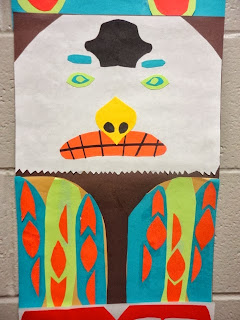
4th Grade Totem Pole Collage


This project has become one of my absolute favorites for 4th grade. I think I tend to say that a lot. From the online response to previous versions of this project, I think a lot of my readers and pinners like this one as well. 

I think this is the third year I had students do their final artwork entirely with construction paper. The first few years I designed this as a painting project, but I wasn't getting the overall success I wanted. I switched it over to collage and, BAZINGA, success! The results from students this year are the best I've ever seen from this project. My 4th graders are an exceptionally talented group this year. 

The toughest parts of this project for kids to grasp are stylizing their chosen animal and filling the vast majority of their paper. I try to get them to think like they are actually carving it out of wood like a real totem pole. The sketching phase takes longer because of this, but it pays off with the final results. 

**Note about accessing my plans**
If you click on one of the links above, it will take you to the file in Google Drive. Feel free to download my lessons for free for your own use. Please don't ask to "share" the file because I have already allowed access and I can't allow further access without enabling everyone to edit my files. I can't do that for obvious reasons. If you click on "File" once you've clicked on the link, you can go down to "Download As..." and select the file type you'd like to download. After that, you can make changes and tailor it to your own classroom use. 

Monday, October 21, 2013

5th Grade Personal Logos


Close-up of selection of original sketches for one logo. 


This project has quickly become one of my favorites in 5th grade. I feel like I'm constantly coming up with cool projects for my older students and I don't have enough time to teach them all. 

The underlying theme with my 5th graders is careers in art. Not every project hits on it, but many of the 5th grade projects directly relate to potential art related jobs. It's pretty obvious that this is one of those projects. 

For this project, each student comes up with a personal logo. We get really in-depth about the design process. Students usually come up with at least 20 thumbnail sketches before getting together with two friends for peer reviews. They then create two second drafts in color before choosing the final design. I would love to have the kids do their final art on the computer, but computer access isn't terribly easy here and I don't have access to color printer anyway. We rock the colored pencils instead. The final logo is presented along with a selection of first and second draft sketches. 

Check out the full lesson plan here! 

Tuesday, October 1, 2013

A sharpening dilemma...

Sharp pencils are important in an art room, right? I'd say so. The problem I've run into is how to consistently keep the pencils sharp. This is the sixth year I've been at Thomas, and I have lost track of how many different electric pencil sharpeners I've had. They all work great for a while, then, without exception, FAIL MISERABLY. I only allow my students to sharpen regular pencils (no colored pencils) and I even have hand-held sharpeners at each table. Nothing has helped. 

Two years ago, I thought I had finally found the best sharpener out there. It was very nice X-ACTO sharpener with auto shut-off, a little blue light that came on when the pencil was sharp, and an 8 year warranty. I thought I'd buy two so they got half the use and would last twice as long. Both failed before the end of the year. True to the warranty, X-ACTO has sent me replacements (3 now), but each of these has eventually died as well. One I'm currently using still sharpens well, but makes a sound like a dying animal.
The culprit.
Have any of you ever had much success with electric (or even good hand held) sharpeners? I would love to have something that actually works for multiple years. Is there even such a sharpener out there? The best sharpeners I've ever used are little metal hand-held sharpeners, but I really don't want to deal with the mess from the shavings. Maybe I just need to hire this guy-->