
My previous 4th grade printmaking lesson was decent, but not outstanding. It was too similar from an art-making perspective to the Wild Things I do with my 2nd graders. This year, I really wanted to push the medium a little more by printing with multiple colors. I ended up deciding to push it to three colors and add in a little vocab by also bringing in the use of complimentary colors.
Check out the lesson plan here!


 |
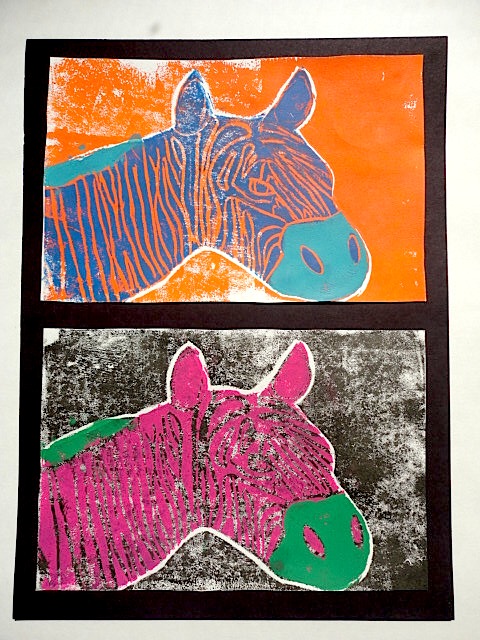
| Close up of the piece above. Wow. |


 |
| Start with a drawing of whatever you want to print. I had my kids do animal portraits. I gave them each a piece of the foam they would be printing on, then had them trace around it to give them the size of the final artwork. I then collected the foam for use the following week. |
 |
| Tape your drawing over the printing foam and use a dull pencil or other blunt tool to press down on the lines of just the outline of the subject. Take the paper off and press down again to make sure the marks are deep enough to make proper prints. I had my students make sure they ended up with three good prints of the background on the first day of printing. |
 |
| Re-tape the original drawing the following class. Press down any remaining details. Cut out the subject along the line that was pressed down last time. Now print with this piece directly on top of the original prints. I had my students use at least one set of complimentary colors. |
 |
| On the final day of printing, cut out a small detail that makes sense to print in a third color. Then, you guessed it, print this piece right on top of the original prints. |
 |
| This was my demo piece I did with the materials above. |
Those really do look striking. They did a fantastic job with their reduction prints!
ReplyDeleteYep, they're super rad Zach : )
ReplyDeletewhat did you do to help them draw such great animal portraits? did they look at pictures?
ReplyDeletehow did they draw these animals? did they look at pictures? they look fantastic!
ReplyDeleteI got about thirty animal books from my school library for this project. Photo reference is huge to get kids to draw what they actually see as opposed to what they think something looks like.
ReplyDeleteAwesome! Thanks for sharing the process. Sounds like a project my own kiddos try this for a summer project!
ReplyDeleteFourth grade! Really exciting results. Love the layering and multi coloring and all the examples!!!! Thanks for sharing : )
ReplyDeleteThis look so fun! What type of foam did you use? I tried a similar type of project with some foam I got from the craft story and it just tore up when I tried to trace my picture on it....if you know the exact brand/type of foam you used that would be great. Thanks!
ReplyDeleteArabeth,
ReplyDeleteI used a product called Scratch-Foam made by a company called Scratch-Art. I've had kids tear the foam in the past, but it's because they were using a tool that was too sharp. A dull colored pencil works really well, actually.
I would love to do this project with some kids in my community (sadly we have no art program in our schools). What type of ink did you use and where did you get it?
ReplyDeleteDave,
ReplyDeleteI used store brand block printing ink from Blick. It works quite well and is super opaque.
These are fantastic! Thanks for sharing!!
ReplyDeleteHi, thanks for sharing this great project! I'm teaching in an area where block-printing ink is not available. I did a printing project with styrofoam dishes and acrylic paint mixed with flour. Results were O.K, but a bit splotchy. Anyone have ideas about how to improve printing with acrylic paint, and if it would work with multiple colors? Thanks!
ReplyDeleteI love this! I was just trying to come up with a variation on printmaking for my 5th graders, and this is perfect! Thanks for sharing! When I share it on my blog, I will be sure to give you credit!!
ReplyDeleteI just finished a variation on this lesson with my sixth graders! It was a truly awesome experience. I've been having a lot of trouble with this year's sixth grade class. They haven't been motivated or engaged at all. This lesson totally got them excited about the materials and working hard. I'm not sure if you'll be able to see these photos on Facebook, but you can try this link if you'd like to see them:
ReplyDeletehttps://www.facebook.com/katiedreskin/posts/10101604520974058
Katie,
ReplyDeleteI'm glad you had such good success with the lesson. I'm looking forward to doing it again this spring. Unfortunately, I wasn't able to see your pictures. I'm sure the work was fantastic!
Love this. How did you get the white accents around the animals? I had students print a whole styrofoam sheet in a single color first and then print their animal on top which leaves no white accents. The white really made your's pop.
ReplyDeleteThanks.
Jamie- The white outline was achieved by just pressing the silhouette of the animal into the foam before the first print.
ReplyDeleteFabulous results! How many class periods did this take? (how many minutes each?) I am not confident with printmaking so definitely will add this for 4th grade this year. Stunning results!
ReplyDeleteElizabeth- From introduction and sketches through final mounting and artists statements, this lesson probably took about seven 45 minute classes. My lessons for my older kids get pretty involved. You could even simplify it a bit by going down to two colors.
ReplyDeleteHow did you get the kids to print their cutouts so precisely onto the previous print? I would think it would be difficult to get just right-- and a lot of them would be off? But all of yours look spot on... what's your technique?
ReplyDeleteI'd love to tell you I had come up with some sort of crazy scheme to make it work, but I didn't. I just demo each step as we're working through the printmaking process. I just tell the kids to carefully print the second and third colors. The only thing I can tell you is that I have my students do three total prints, then they mount their best two for their final piece.
ReplyDeleteBEST EVER! I jumped into this with my fourth graders and it is going so well!!!! I can't even express how wonderful these look. Thanks for explaining how you did it. I will make sure to link back to you when I blog about it.
ReplyDeleteThanks Ms. Novak! From following your blog, I think our teaching styles are pretty similar. I'm glad you like the lesson so far. I'm looking forward to seeing the finished work!
ReplyDeleteI've been meaning to stop by and thank you - I did this with my Art class last year, combined Grades 1 through 6 (truly!) and the results were just gorgeous! One of my favourite projects ever.
ReplyDeleteI did this project two years ago and am wanting to do this again. My question is, how did you manage the ink and brayer system? I had them wait their turn, stand in line and helped them put the ink on their block and it took a long time. Just wondering if you do this step differently.
ReplyDeleteI set up six ink stations throughout the room. Students ink their own foam and are even allowed to add additional ink if the station is running low. I do a pretty thorough demo first, so that helps. I never have had to ink somebody's plate for them. I also start printmaking in 1st grade, so by 4th it's pretty familiar. Good luck with the project!
ReplyDeleteExcited about trying this project with my Art Camp. Can I use acrylic paint for the printing process? How did you get the first layer? Did you brayer ink on your base foam with the impressed outline first? What is the material on which you are printing--foam or paper? Karen
ReplyDeleteWould acrylic paints work for this project
ReplyDeleteI haven't ever tried acrylics with this type of printmaking. I don't think they'd work as well as block printing inks, but they may still work. It would be worth trying at least.
ReplyDeleteMy students did the basic outline for the first print. Check out my detailed step by step pictures at the bottom of the post. We just print on white drawing paper. Hope that helps!
Beautiful project and wonderfully executed! Are both colors done at the same time? I noticed that the detail lines and background is on one color while the animal is in another- just wondering if this was added by hand on the foam in a single step or if the second color was printed on top of the first layer.
ReplyDeleteThank you for posting this and for your time!
It is printed three separate times. If you look at the bottom of the post, I included images of the foam before I did each print. The color builds each time. Thanks for the compliment!
ReplyDeleteGreat results and process!
ReplyDeleteI'm preparing for a printmaking series. Trying to piece together a good group of lessons to do for a 6 week session (1.5hr classes) that will give them a thorough experience with printmaking. Ages about 10-16 yrs. I like the layering of this lesson (separate prints for different colors).
I think this will be added. Thank you!
How did the students cut the animal shapes out? Did they use scissors or exacto knives, or did you help? Thanks!
ReplyDeleteRachel
Rachel- They used scissors. Super easy.
ReplyDeleteThese are gorgeous. I'm writing a grant to try to get some of the materials paid for and wondered how many students you taught and approx how much ink? Thanks for sharing, especially the detailed lesson plan.
ReplyDeleteThanks! I usually have 100-125 4th graders. I used 6x9 foam (cut in half from a 9x12 piece) which probably cost $30-40. I set up 7 ink stations and typically go through 10-12 tubes of block printing ink. I like Blick's store brand. It's good quality and actually made by Speedball. I'd say the whole project cost around $100. Good luck!
ReplyDeleteI won the grant and am into days 3 and 4 with all my fifth graders and they are completely into this. This has been a big challenge but I love hearing them self correcting and getting better and better prints. This is such a wonderful lesson for learning the steps from creation through reflection, revision, and final product. My principal loves the connection to writing and engineering. Thank you for your inspiration!
ReplyDeleteFyi: Recently I found packages of 30 Styrofoam trays (6x8 I think?) For a $1 from the Dollar Store - they sometimes do and sometimes don't have them in stock. I periodically check and when they do I stock up! Yes, I or the beasties have to trim the lip off the trays but for a buck, it's totally worth it. I have heard of a substitute for the BP ink (though it produces the best, cleanest results) is acrylic mixed with liquid dish soap. I haven't tried it but it's not expensive to find out 😊. I love printing and wanted to give the students a chance to try it a couple times so the first was about learning and the second was using that knowledge. I couldn't afford to do it with 200 kids with scratchfoam, but it was great with the $ store trays! Only thing I hadn't considered was having enough drying racks to accommodate all the wet prints... hope this might help cost-wise!
ReplyDeleteLove this project!! I am doing a Where the Wild Things Are theme and at the drawing stage they look really great! My questions are...did you use a press to print or hand rubbed? When the kids get to step 3 do they mount the smaller pieces with the print face up to ensure registration? Thanks for such a great inspiration!
ReplyDeleteMichael- First of all, I'd love to see your Wild Things take on this technique. Cool idea! I have the kids use a clean brayer to press the prints. It really improves print quality over hand rubbing. I don't do anything special for students to ensure registration. I just have kids print directly with the small pieces of foam onto the previous print. They just eyeball it and go. The print is facing up the entire time, so it's not too difficult for them at all. Good luck!
ReplyDeleteWhat brayers have you found that work well? I want to do this project in my school so of course cost is a factor, but I will have over 300 students using them and need them to hold up with a lot of use. Any suggestions?
ReplyDeleteAmy- I have been using Speedball soft rubber brayers for 10+ years. They were here when I started and are probably 15-30 years old. I have about 500 kids using them each year. They still work wonderfully. I like to have one per inking station that I have set up as well as 2-3 per table so students can use a clean brayer to press the foam onto the paper more evenly.
ReplyDelete