Instagram

Showing posts with label castles. Show all posts

Friday, May 29, 2015

I hate it when that happens...

Clay projects are always the most exciting for many students. At Thomas, each grade level gets one clay lesson during the school year. 2nd grade classes had been making clay dinosaurs for the last couple of years. I saw that Ted over at Art with Mr. E did dinosaurs hatching out of eggs a year or so ago, so I thought that would be a fun way to change up the lesson. 

4th graders have always done clay castles. It's the only lesson I wrote during my student teaching that I still use. It's a project that kids look forward to from 1st grade all the way up until they're actually rolling out the slabs in order to make their castles in 4th grade. It's a super fun and engaging lesson. 

A funny thing happened this year, though. I nearly completely forgot to take pictures of the artwork for both of these projects. They were both completed right before the art show this spring and I passed them out having never photographed the work. I hate it when that happens. 

Well, here they are. Three images of the elusive bigfoot 2nd and 4th grade clay projects. 


Wednesday, May 14, 2014

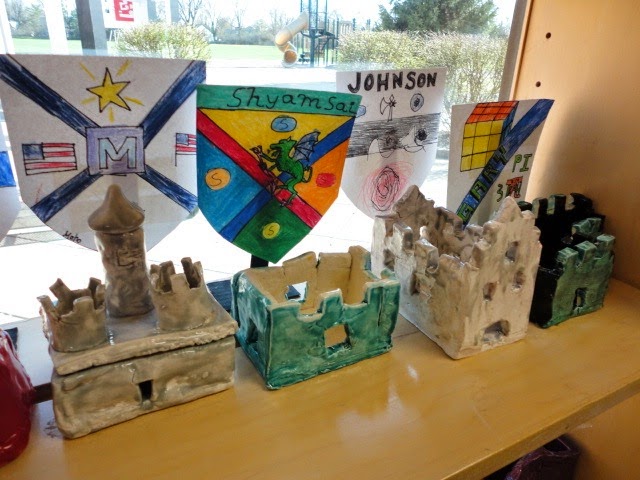
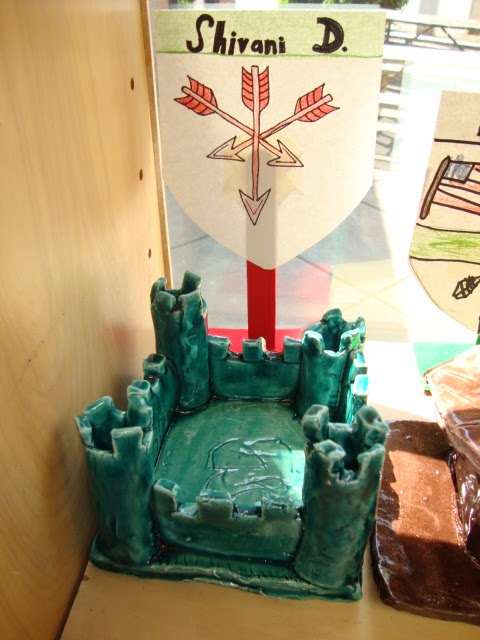
Clay Castles and Coat of Arms by 4th Grade

This student had just moved from Japan.
What an amazing example of a Japanese castle!!!

 I love clay. I like how it feels. I like how it smells. I like how many things can be done with it. The custodian does NOT like how, even after a thorough cleaning, it still gets tracked out of my room and down the hall. 99.9% of kids tend to agree with my assessment of clay. It's just plain fun.

Castles are an ever popular project at Thomas. It's a lesson I wrote while I was student teaching many moons ago and is the only lesson from that time that I've held onto. By 4th grade, students at Thomas have had experience with basic forms, attaching with scoring, wedging, and basic sculpture. This combines some of those skills and adds the concept of slab construction. 

I really like to use square dowels from the hardware store in order to get the thickness for the slab. There are other products out there, but the dowels have always worked perfectly for my students. 

The variety of artwork is pretty awesome with this project. No two castles are ever the same. Some students get more advanced and wind up with time to make a removable roof (lid) for their castles. The coat of arms winds up being a fancy way of making a name label. It adds some class to the whole project. 

Click here to download my lesson plan!

Monday, May 20, 2013

Clay Castles with Coat of Arms by 4th Grade

Every art teacher has projects that are yearly favorites. Students would go absolutely nuts if they didn't get to do "that project." This is one of those projects for me; kids start talking about wanting to make castles in 1st grade. I actually wrote this lesson way back when I was student teaching and have continued using it for 4th grade every year since. 

Castles are a topic that kids always seem to be interested in. I show my students examples from all over the world as inspiration, then let them loose with sketch paper. I have them each draw at least a front and top view of their castle. I found that the top view really helps them understand how they will actually make it out of clay. 

After that, it's just basic slab building. This project takes about 4 days of working with wet clay. I know some people have problems with projects drying out, so I'll share my method of keeping ceramic work wet. 

Mr. Stoller's Tried and True Method for Keeping Clay Moist
  • I use old cafeteria trays for storage. Most classes use 3-4 trays.
  • Place the work on the trays at the end of class. I do this because I was good at Tetris and can fit more castles per tray than my kids can.
  • Cover the entire tray with damp paper towels. I assign this job to a couple of responsible students per class.
  • Place the entire tray into a large trash bag. Push out as much air as possible and fold the open end under the tray.
  • I write the teacher's name on a piece of masking tape and put the tape on the bag so I don't mix up the work.
  • I just open up the bags the next time that group has art, and the clay is still perfectly moist. Use new paper towels when putting the clay away at the end of class.
  • If a class misses or there is an extended break, I will open up the bags and squirt a little water into them.
Hopefully those tips are helpful. I have my students create a coat of arms in between when they finish their castle and when they glaze it. I always give clay projects a couple of weeks to dry out before the bisque fire. It is longer than they really need, but I've never had a clay project explode!


Monday, March 4, 2013

What are your favorite projects?

Everyone has favorite projects. Sometimes they are tried and true lessons that students love and look forward to working on each year. Others are fresh and new; maybe you have only taught them once or twice. I'm devoting this post to my favorite projects. I'm hoping that some of you will tell me about yours as well. 

My idea is for people who read this blog to post a link to their favorite lessons in the comment section for this post. The link could go to another blog, Pinterest post, or other outside site. I will then put the info, pictures, and maybe even lesson plans into this original blog post and fill it up with all kinds of awesome. Let's see how this goes. 

I'll start with a few of my own favorite projects. This first one is something that I did for the first time last year with my 5th graders. PLUSH MONSTERS!!

This project is one that I have been doing since student teaching. Clay Castles are incredibly popular at my school. I have students from first grade up asking when they get to make them. Of course kids always love to work with clay, so having an exciting lesson built around it is just a bonus. If I would ever stop doing this project, the villagers would probably revolt!

Finally, this is a project that I have adapted a little from a colleague in my district. It combines my love of science with sweet art skills to end up with a super cool project. It also ties in closely with third grade science curriculum. Your principal will love this lesson as well. It is all about using simple machines to create a Rube Goldberg style machine inside the head to complete a task that ordinarily happens in the head. Simple Machine Brains are great fun.

 Now it is time to comment with links to your favorite lessons. I can't wait to see all of the interesting and innovative projects that all of you are working on. 

Rina over at K-6 Art wins the prize for the first favorite lesson comment! Virtual high five! Her favorite project post is Oil Pastel and Baby Oil 'Paintings.' She is using a super cool technique using baby oil to allow the pastels to blend more like paint. Check out her blog for more information!

Amber from Schooling at Home Happenings uses blogs to find quality art projects for her students. She likes this project that is based on the work of Henri Rousseau. Amber really likes that the project reinforces information about climate zones, weather, and animals. The cool thing about this blog is that she has a wide range of ages working on the same project. It is really interesting to see how the project is adapted to different age groups. 

Thursday, April 26, 2012

4th Grade Clay Castles & Coat of Arms

Wow. Beautiful design! 
I love clay. If I could do clay projects all year I would seriously think about it. I tend to schedule my clay projects toward the end of the year because it is convenient to have everything at school for the art show. This project is one that I tried out during student teaching many years ago and have continued because my students enjoy it so much. 


We study castles from all over the world and each student designs their own castle. Using a slab building technique, they spend about five classes building their castles, adding details, and glazing. Last year, I decided to have each student make a small coat of arms while we were waiting for the castles to dry and be bisque fired. In addition to looking really cool, the coat of arms also serve as a name tag for the castles at the art show. All of the lower grades constantly ask about when they get to make clay castles. First graders are really bummed out that they have to wait for so long! 


Here is the lesson plan!


Tuesday, April 12, 2011

4th Grade Clay Castles


4th graders just finished one of the favorite projects in all of elementary art at Thomas.  Clay castles have become legendary in the hallways.  Each student starts by studying castles from all over the world before designing their own.  Students use slab building techniques in order to create their clay castles.  The variety of shapes and details always amaze me.  While they are waiting on the castles to dry and be fired, students create a coat of arms that is placed behind their castles.  Finally, the castles are glazed and set on display shelves to be marveled at by the entire school.  Huzzah!  


Tuesday, March 23, 2010

4th Grade Clay Castles


4th grade just finished their ceramic project for the year.  It has become a tradition to build castles in 4th grade.  After learning about the Middle Ages and seeing castles from all over the world, each student designs their own castle.  Students use a slab building technique to construct their castles.  After a bisque firing, castles are glazed and glaze fired.  Each students also designed a coat of arms to be displayed with their castles.  These turned out fantastic this year!

Tuesday, March 17, 2009

4th Grade Clay Castles


4th grade students recently finished learning about the middle ages. We looked at examples of castles built by many different cultures and studied why each castle was built. Students were then able to design and build their own castle out of clay using a slab building method. This project is a favorite of many kids and was a hit again this year.