

Thursday, March 15, 2018
Ask the Art Teacher
I recently had the honor of being interviewed by Mark Rode, the man behind the IG account @oxbow_creek_elementary_art Mark has a new blog called "Ask the Art Teacher" dedicated to teaching tips and getting to know art teachers through interviews. I was his second interview for the site. It's a great website and will be an outstanding resource as it grows. Check out my interview here!

Wednesday, February 14, 2018
3D Printed Architecture
The blogging community is a wonderful source for ideas. It's one of the reasons I started blogging in the first place. Through reading blogs, I found many ideas that I adapted to teach in my classroom. I started the blog as a way to share my students' work as well as a way to return the favor in terms of putting new ideas out there.


It's rare, but I've found myself in a position that I haven't been in before in my teaching career. Having a 3D printer in the classroom is still pretty uncommon. Having a 3D printer in the art room is apparently far more uncommon.
When I first started using the 3D printer with my 4th and 5th grade students last year, I was also new to the technology. I wanted to use the project to see what students were capable of and how they would adapt to creating art in an entirely new way. Essentially, I allowed students to make pretty much any original creation they wanted. There were some absolutely beautiful designs, but there were many students who didn't do well with complete freedom and wound up never really grabbing onto a solid idea.
I knew that for year two of using the 3D printer, I wanted to come up with a lesson that provided a solid framework while still allowing for plenty of creative freedom. This is when I found that this kind of technology is still in its infancy in the art room. There are "lesson plans" around that use 3D printing, but most were either far too simple, far too complex, or didn't connect to my curriculum in any way. I chose instead to start from scratch.
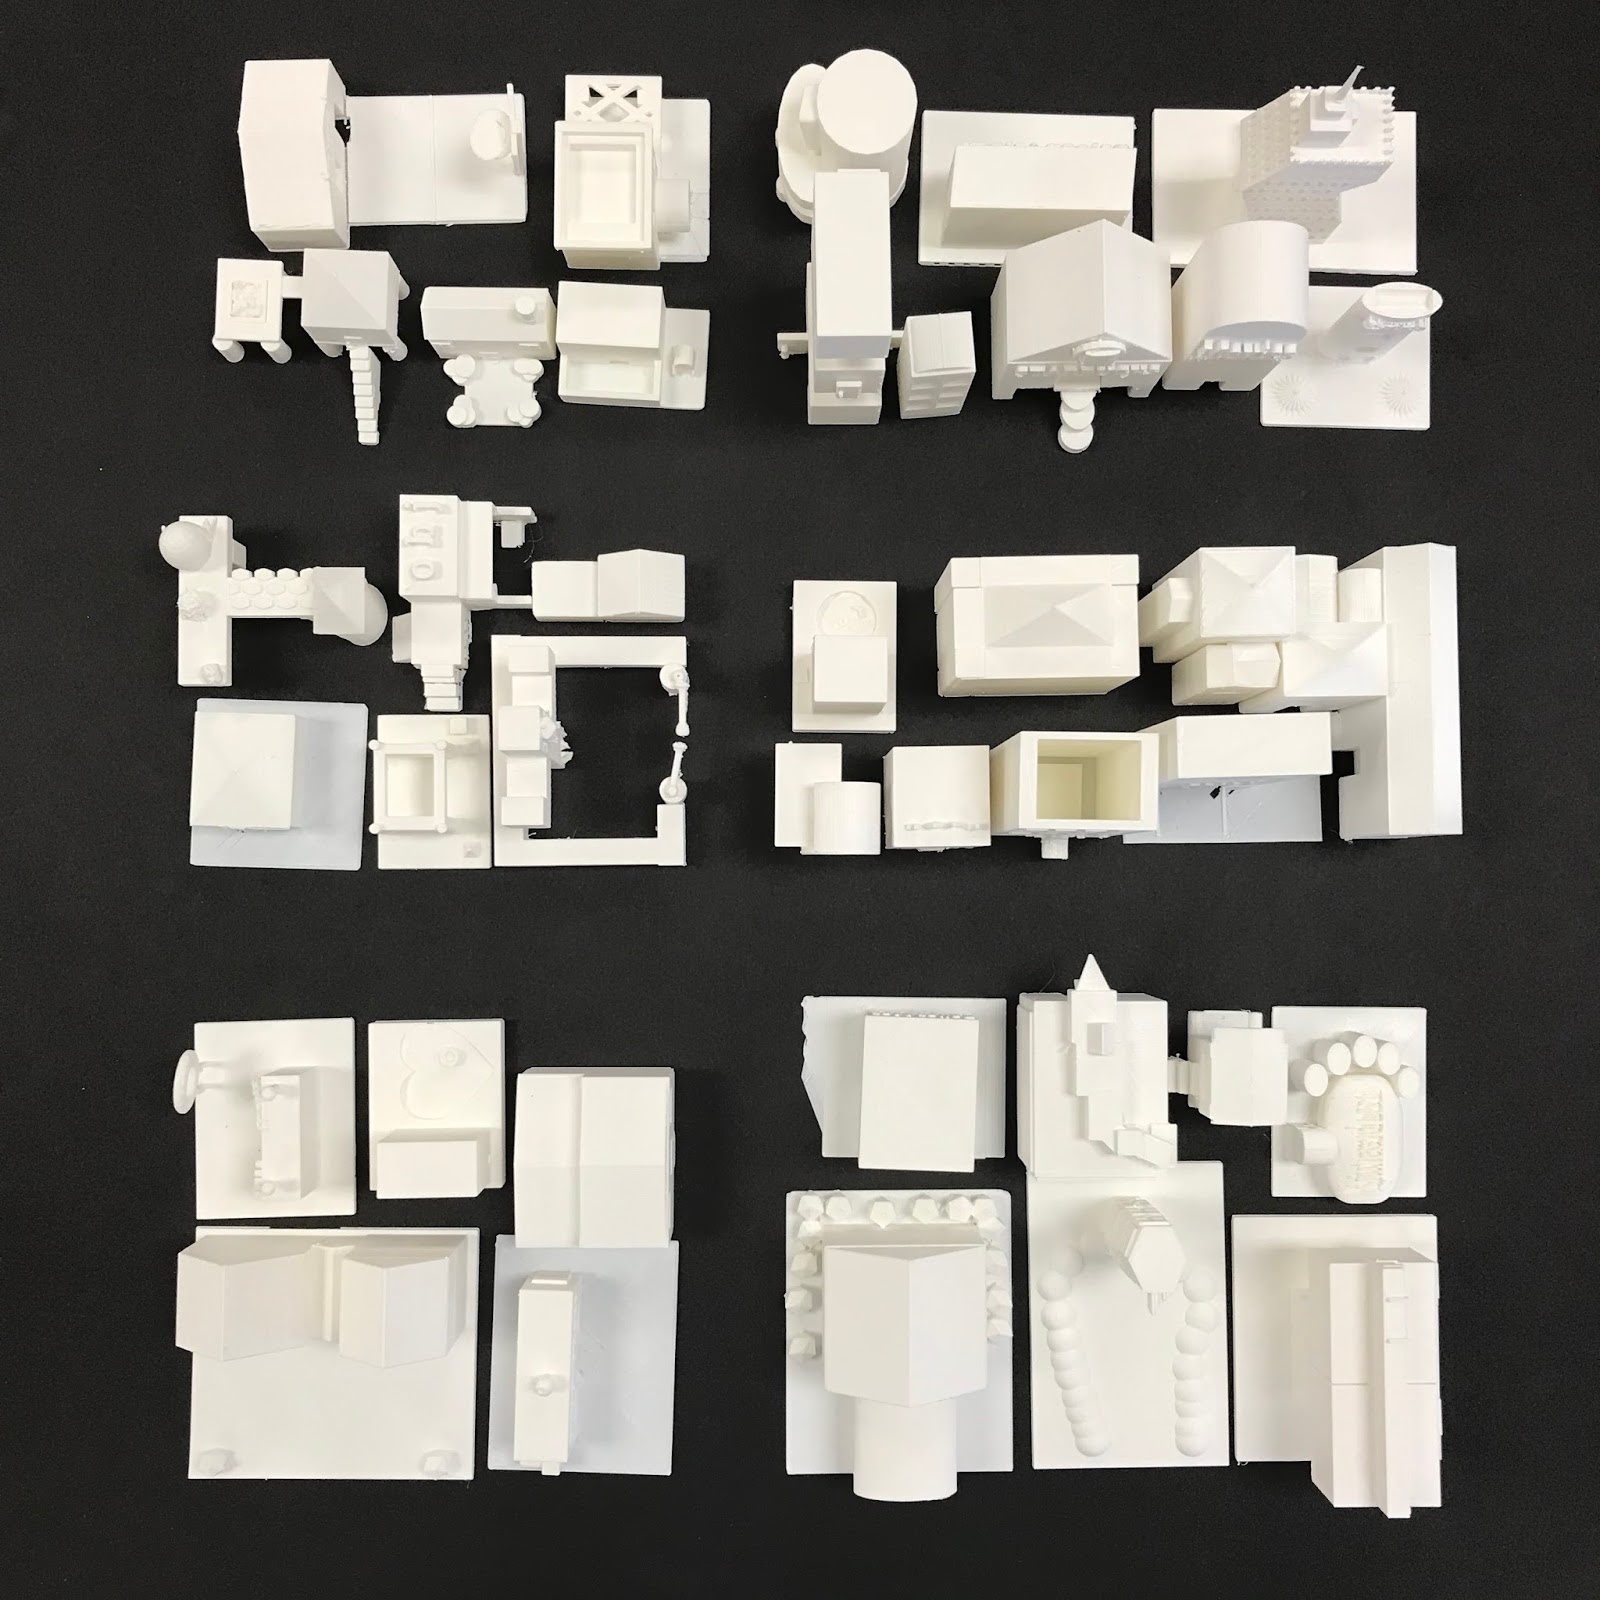
For 5th grade, I chose to take something that several students had been successful with last year- buildings. I came across a 3D printed city as I was looking for examples of printed architecture.
 |
| San Francisco 3D model by Steelblue. |
My students studied various styles of architecture and came up with the types of structures found in towns and cities. Each student designed their own building on paper before moving on to work digitally. I have used an online program called Tinkercad both years I've worked with 3D printing, and I've found that it's very user friendly.


I have five 5th grade classes and I'm currently finished printing the work from three of them. The 3D printer is constantly running this time of year because each building takes 2-3 hours to print. I'm so excited for the finished city that I went out and bought some black foam core board and tested out a layout with about 50 of the buildings that have been printed. The finished city will be presented at the art show in April and I can't wait to see how it turns out!


Wednesday, February 15, 2017
3D Prints!
I can safely say that 3D printing has been a hit. I have learned so much throughout the time it took to teach and print all of my 250 4th and 5th grade students. I started out working with 5th grade and changed how I taught by the time I started 4th grade simply because I learned so much about the process by teaching and printing 5th grade work. Simple things that I hadn't even considered wound up creating fairly major printing errors. Other things that I thought would be problematic wound up being fine.


I let my students choose to create whatever they wanted to print. We used a free online program called Tinkercad. (I highly recommend it.) I wound up having several students facing the dreaded open-ended project block. I think it was a combination of such wide choice and using a completely new media that was a little tough for some kids. The vast majority of my students had a more concrete plan and wound up creating pretty cool designs. This has been a wonderful way to integrate technology into my classroom. It teaches students new skills that are so incredibly applicable to so many jobs that will be available in the future.


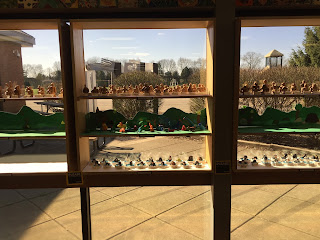
Printing is what takes the most time. I've been printing pretty much non-stop since winter break. I've completely finished printing my 5th grade work and I'm a little more than 3/5 of the way through 4th grade. The printing should be finished next week! I'm able to print 4-5 designs at a time. I start the printer right when I get to school in the morning and I'm usually able to get two sets per day. The up side is that the printer makes all kinds of futuristic sounds and I can pretend I'm in the Jetsons!
 |
| This is most of the work from one class. It took about three days to print all of these. |

Obviously I'll be using the printer more in the future. I'm working with our gifted intervention specialist to have students create more intricate designs to print and send to our sister school in China. Next year, I'm thinking about more specific lesson ideas to use. I really like the idea of using industrial design and the design process as the basis of a lesson. Students could create designs that would be solutions to a problem they encounter in life. Who knows? The options are endless.
Wednesday, December 21, 2016
3D Printing!
The future. It's here. At least it is in my art room.

 In addition to learning the hardware, there are various types of software that are available for 3D printers. I'm using a web-based program called Tinkercad. It is free to sign up and is pretty easy for students to learn. They have a whole series of tutorials that I used to learn the software. I wound up setting up 30 different accounts that my students share. I have a few students in each class who have set up their own accounts at home as well. The best part about Tinkercad being web-based is that students are able to access it from home if they really want to put extra time into their work.
Last year, I did some fundraising and wrote a grant in order to buy a 3D printer. My 3D dreams came true and I was able to purchase an Ultimaker 2+. I wound up ordering it last spring, but I didn't plan to use it until this year.

Prior to buying the printer, I hadn't ever used one before. I don't think I had ever seen one other than online pictures. A colleague had purchased one and raved about using it with students.
After I got the printer, I immediately started learning how to use it and figure what it is capable of. 3D printers use a specific type of 3D image file in order to produce the print. Special slicing software takes a 3D image and divides it into hundreds of individual layers that the printer prints. There were several preloaded files that I did test prints with, but I quickly found sites like thingiverse.com that are 3D community sites in which files are available for download and there is plenty of information about printing.
 In addition to learning the hardware, there are various types of software that are available for 3D printers. I'm using a web-based program called Tinkercad. It is free to sign up and is pretty easy for students to learn. They have a whole series of tutorials that I used to learn the software. I wound up setting up 30 different accounts that my students share. I have a few students in each class who have set up their own accounts at home as well. The best part about Tinkercad being web-based is that students are able to access it from home if they really want to put extra time into their work.
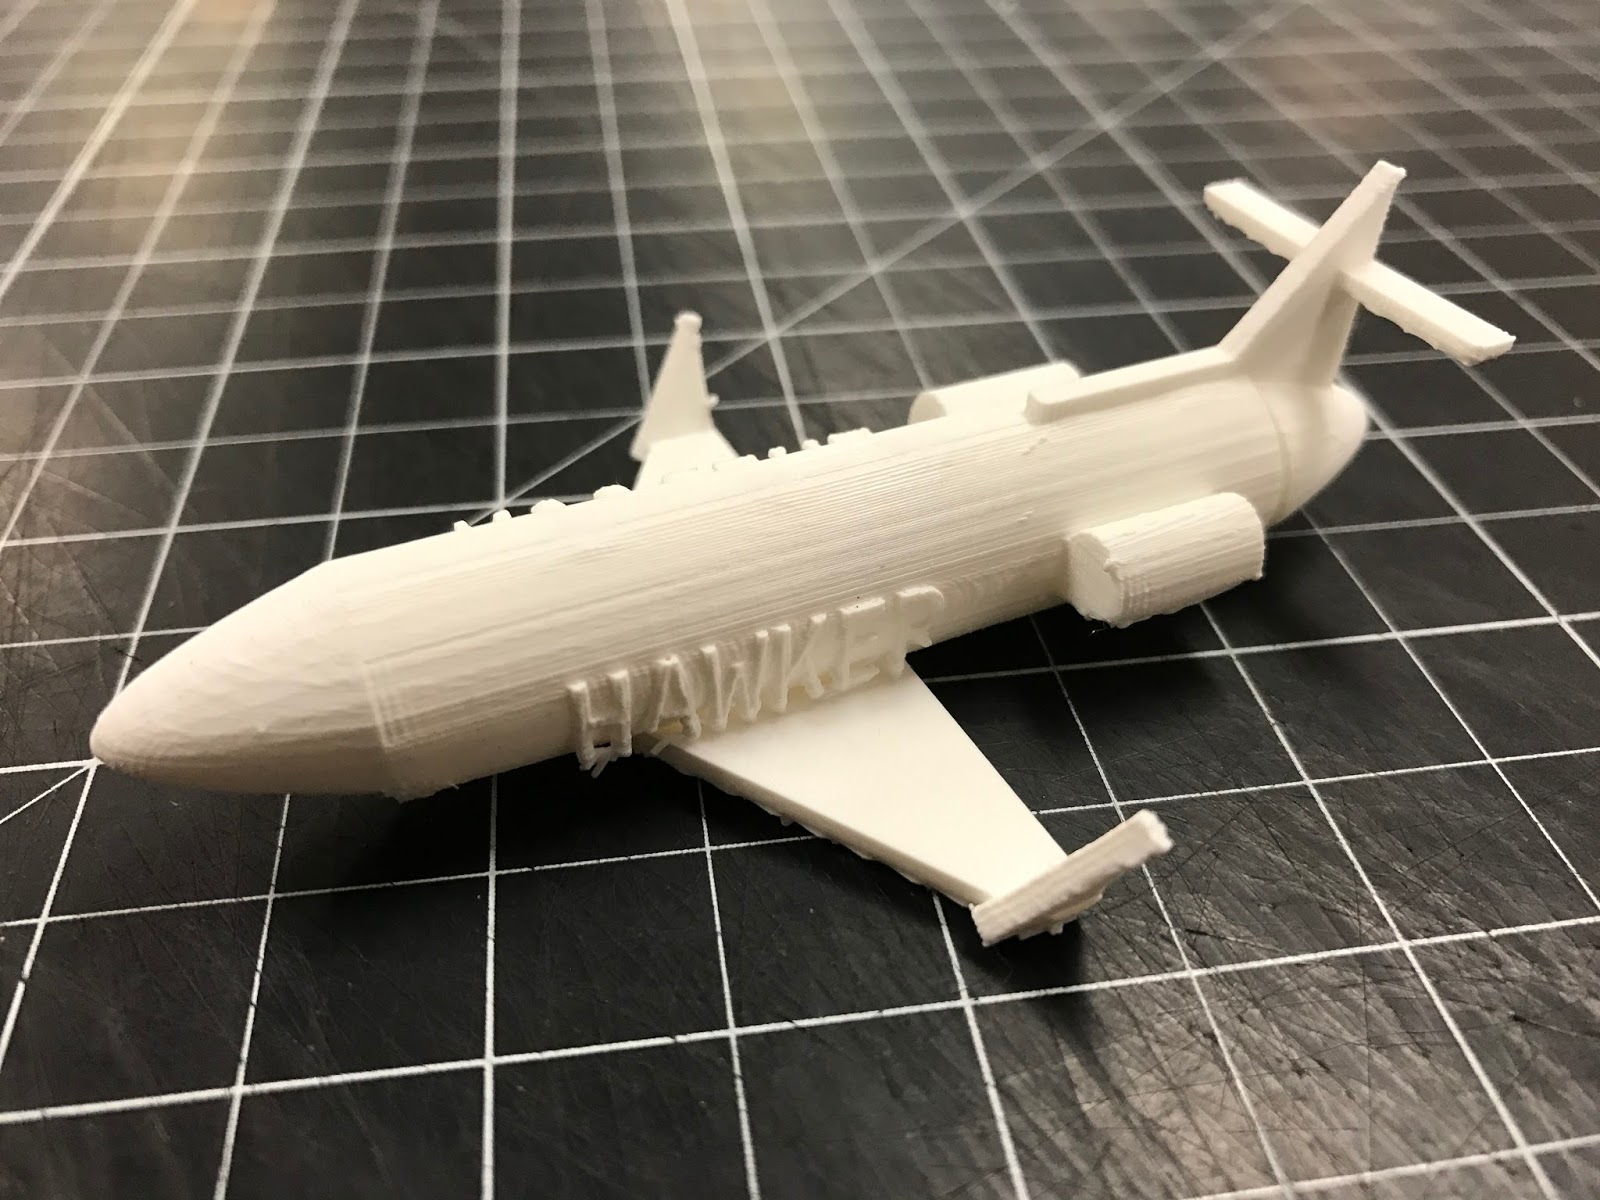
You might be asking yourself why I would put a 3D printer in an elementary art room. In my opinion, it's just another tool to be creative with. Students still use creativity to come up with their own designs. The computer just becomes another form of media. I have about 250 4th and 5th graders that are currently working on laptops in order to create their designs. Touching on my last post about choice, I set up three loose categories that students can work within. Students choose between creating dream houses/buildings, transportation, or figurines. The open choice stumped a few students, but the majority have been able to come up with pretty solid ideas to build off of. We started with a day of sketching, then did a training day with Tinkercad. I'm giving each class 4-5 additional classes to work on their projects before they download the 3D files and send them to me.
 |
| 5th grade piece in progress. His grandfather is a pilot and he's making him a model of the plane he flies. |
This project has been a really nice change of pace in so many ways. It's nice to having something so different going on in my classroom. Using Tinkercad is new and exciting for the students, so they are incredibly engaged in what they are doing. It has also given students another way to excel in my classroom. Some students who may not be the most artistic kids in the class have really taken off with this project because it uses an entirely different skill set than traditional art making.
 |
| I made a quidditch pitch as my demo piece. I'm cool with how nerdy that is. |
Do any of you have a 3D printer? I'm super interested in hearing about projects that you've come up with to use it. It's truly an amazing technology and I couldn't be more excited to have it in my classroom.
Tuesday, October 25, 2016
Thoughts About Change
Change.
It's something I've been thinking about quite a bit lately. I feel like I do a pretty good job as an art educator, but I'm intrigued by some new (or not so new) ideas that I've come across lately.
I suppose I should start by explaining my teaching style and background. Art has always been "my thing." I graduated from Columbus College of Art & Design and went directly into the Master's program for art education at The Ohio State University. My education has greatly influenced my style. Technique and technical skills were often at the heart of my own arts education.
As I develop lesson plans for my students, I use art, literature, and techniques as the basis for most of the projects I create. For example, a very popular lesson that I've posted about in the past is my totem pole project. The heart of the project is stylization. Students discuss and visually dissect culturally accurate examples of Pacific Northwest Native Americans. Students take quite a bit of time to develop good drawings of an animal of their choice in order to make it stylistically match the artwork we are studying. The final version of the project is a beautiful and often quite intricate collage of construction paper. Because we spend so much time developing drawings and studying art, this is an extremely successful project.


Enter meetings with my elementary art colleagues. My district currently has 12 elementary buildings and the same number of elementary art teachers. Of the 12 of us, three run choice based classrooms. I'm intrigued by the idea of choice based art because I can see that students of those three teachers are doing work that is more personally meaningful. There is often deeper thought in the student work and I like the flow of work from one project to the next. I have added quite a bit of choice into my projects, but there is always a lesson plan that the student choice fits into.
My biggest struggle with purely choice based instruction is the actual artwork. Since instruction time of actual techniques is so limited, I see so many pieces of artwork that have great ideas, but poor execution or craftsmanship. I know many of my lessons are outcome based. There is a lot of good thinking and creativity that go into the lessons, but the goal is ultimately to provide learning experiences for students that provide a balance of technical skills and meaningful thinking and creativity.
At my latest elementary art meeting, we met in the room of Mr. Callicotte, a colleague who secured funding to completely redesign his classroom. In was, in one word, stunning. He was moving toward choice based learning, but realized that different students have different learning preferences and needs. He did an activity that resulted in students figuring out what kind of environment resulted in their best work. The design of the room was such that it accommodated learning needs and provided space for different media as well as gathering space for the whole class to learn together.
I feel like I'm at a crossroads for my teaching style. I want to make some changes to my space. I want to make some changes to my style in order to provide considerably more choice while still maintaining the quality of the finished art. Is there a name for this style? Maybe I'm being innovative and coming up with the missing link between traditional teaching and full choice. Probably not. I'm sure some of you are already doing this.
Do any of you do anything similar? What are your successes and struggles? I can't wait to hear.
It's something I've been thinking about quite a bit lately. I feel like I do a pretty good job as an art educator, but I'm intrigued by some new (or not so new) ideas that I've come across lately.
I suppose I should start by explaining my teaching style and background. Art has always been "my thing." I graduated from Columbus College of Art & Design and went directly into the Master's program for art education at The Ohio State University. My education has greatly influenced my style. Technique and technical skills were often at the heart of my own arts education.
As I develop lesson plans for my students, I use art, literature, and techniques as the basis for most of the projects I create. For example, a very popular lesson that I've posted about in the past is my totem pole project. The heart of the project is stylization. Students discuss and visually dissect culturally accurate examples of Pacific Northwest Native Americans. Students take quite a bit of time to develop good drawings of an animal of their choice in order to make it stylistically match the artwork we are studying. The final version of the project is a beautiful and often quite intricate collage of construction paper. Because we spend so much time developing drawings and studying art, this is an extremely successful project.


Enter meetings with my elementary art colleagues. My district currently has 12 elementary buildings and the same number of elementary art teachers. Of the 12 of us, three run choice based classrooms. I'm intrigued by the idea of choice based art because I can see that students of those three teachers are doing work that is more personally meaningful. There is often deeper thought in the student work and I like the flow of work from one project to the next. I have added quite a bit of choice into my projects, but there is always a lesson plan that the student choice fits into.
My biggest struggle with purely choice based instruction is the actual artwork. Since instruction time of actual techniques is so limited, I see so many pieces of artwork that have great ideas, but poor execution or craftsmanship. I know many of my lessons are outcome based. There is a lot of good thinking and creativity that go into the lessons, but the goal is ultimately to provide learning experiences for students that provide a balance of technical skills and meaningful thinking and creativity.
At my latest elementary art meeting, we met in the room of Mr. Callicotte, a colleague who secured funding to completely redesign his classroom. In was, in one word, stunning. He was moving toward choice based learning, but realized that different students have different learning preferences and needs. He did an activity that resulted in students figuring out what kind of environment resulted in their best work. The design of the room was such that it accommodated learning needs and provided space for different media as well as gathering space for the whole class to learn together.
 |
| Mr. Callicotte's redesigned art classroom. New design to meet new needs. |
 |
| My current classroom. |
Do any of you do anything similar? What are your successes and struggles? I can't wait to hear.
Thursday, September 22, 2016
Back to school....now?!?
Some bloggers write all summer long. Good for you if you're one of those all-stars! Summer is definitely a break from blogging for me. My school district started the year on August 15th. You may have noticed that I haven't posted since then. Is it because my summer lasted a little longer this year.
Do I know some sort of secret loophole embedded deep in my contract that allowed me to spend more time at the pool while the rest of the staff was busy teaching? Well, kind of.
That part of the contract would deal with paternity leave. My wife and I welcomed our second daughter into the world on August 10th. Her name is Graylie and she's pretty awesome.
I was lucky enough to be able to spend the first month of school at home to help out with the new addition to my family.
Of course that means that I had to write a mess of sub plans and trust someone else to start the year for me. That alone was no easy task. All in all, I really enjoyed the extra family time and I know my wife appreciated the help.
Now I'm back to school. I'm one week in and getting back into the swing of things. New posts will be coming soon. There are a lot of changes this year with the addition of traveling related arts teachers, new projects, new technology, and continued creative learning. I'm looking forward to a great year!
Do I know some sort of secret loophole embedded deep in my contract that allowed me to spend more time at the pool while the rest of the staff was busy teaching? Well, kind of.
That part of the contract would deal with paternity leave. My wife and I welcomed our second daughter into the world on August 10th. Her name is Graylie and she's pretty awesome.
 |
| Big sister and little sister! |
I was lucky enough to be able to spend the first month of school at home to help out with the new addition to my family.
Of course that means that I had to write a mess of sub plans and trust someone else to start the year for me. That alone was no easy task. All in all, I really enjoyed the extra family time and I know my wife appreciated the help.
Now I'm back to school. I'm one week in and getting back into the swing of things. New posts will be coming soon. There are a lot of changes this year with the addition of traveling related arts teachers, new projects, new technology, and continued creative learning. I'm looking forward to a great year!
Tuesday, June 14, 2016
3rd Grade Terra Cotta Warriors
I was lucky enough to post a student teacher again this year. It was my fourth time in the last five years and it went extremely well. Based simply when student teachers are placed in my building, I often will have them work with students on a couple of projects that will wind up in the art show.

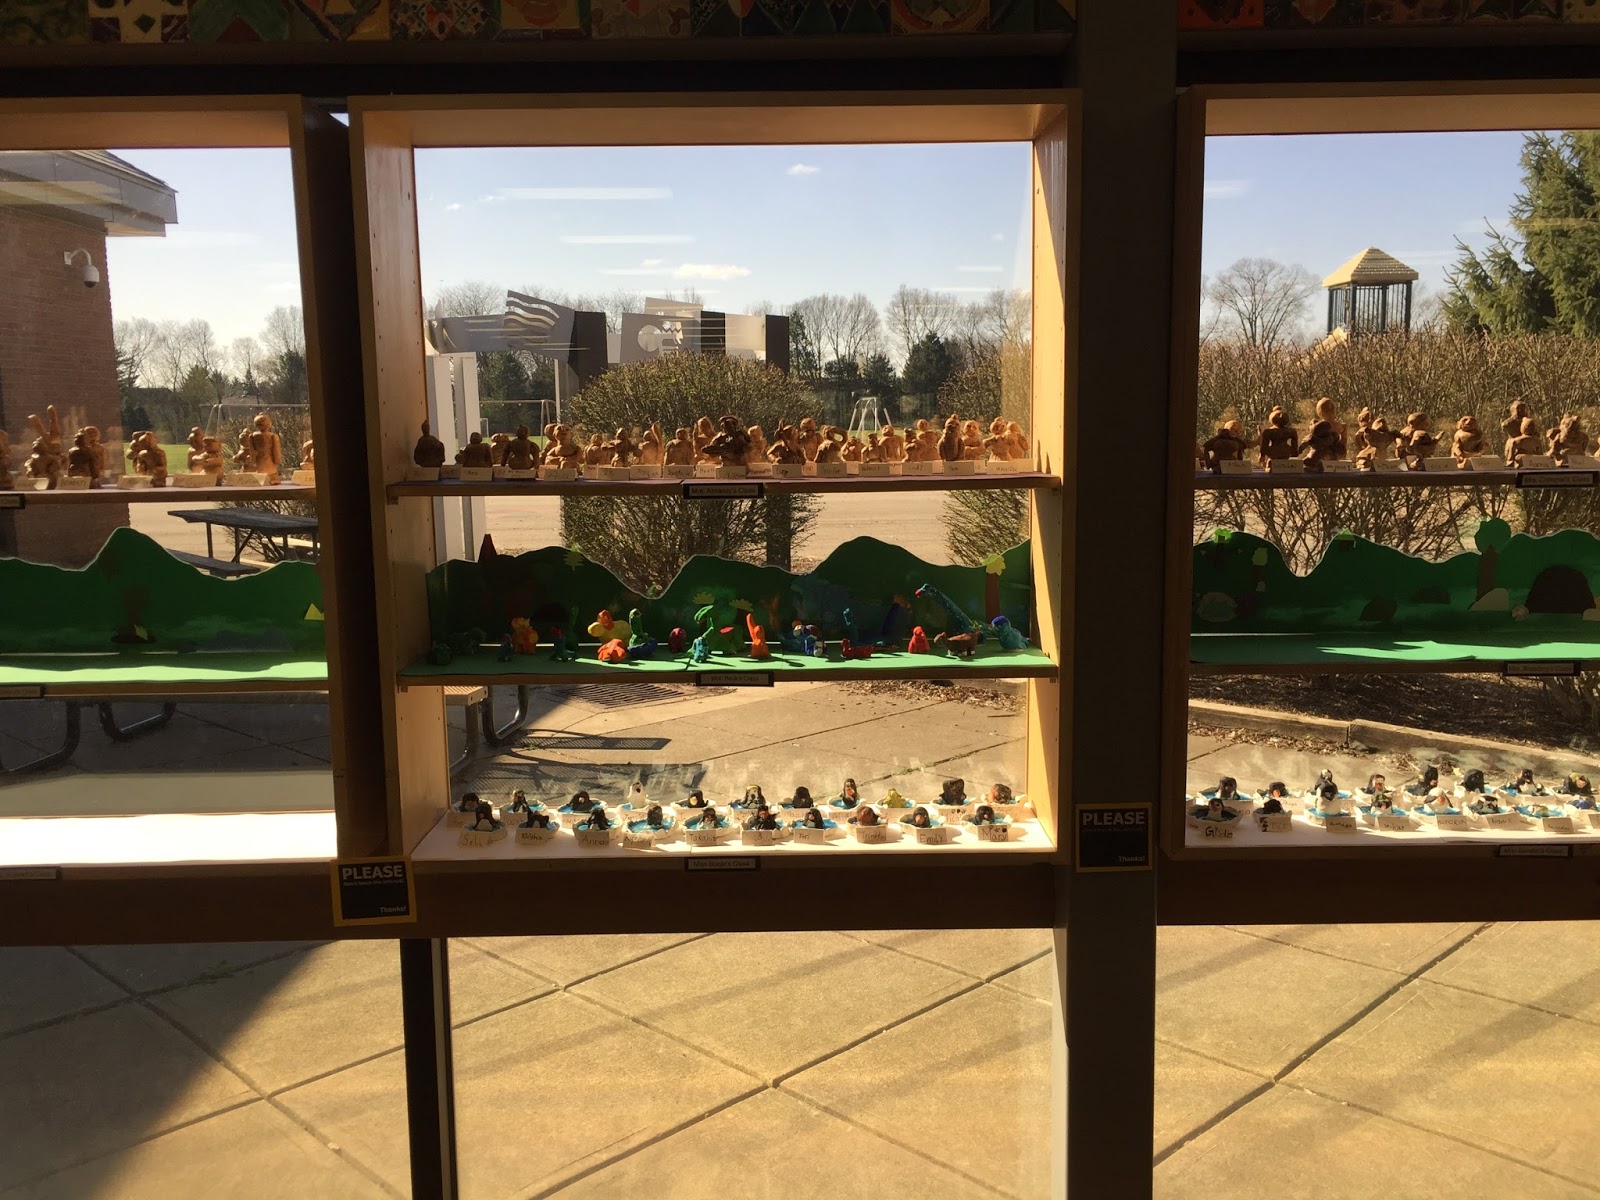
Miss Christie Paul, who was from The Ohio State University, worked with my students for a total of seven weeks. She had written this clay lesson previous to working with my students and I told her it was too cool not to use.
Miss Paul led discussions about the Terra Cotta warriors found in China. Students learned that each one is different and the sculptures represented many different types of people, not just warriors. Each student first drew his or her own warrior before building it out of clay. The clay went together piece by piece over the course of about three classes and was put together using scoring and a few drops of water. Some details were carved in after the sculpture was finished.
The warriors were bisque fired, then they needed some paint. We used a two step process that works very well for aging sculptures. Students first painted the entire piece with a mix of acrylic paints that gave it the basic warm light brown color. After that layer was dry, students went over the whole sculpture again with a wash of darker brown paint. This was almost immediately wiped off. The cool part of this technique is that the wash will fill into details and cracks which really brings out the smaller, more intricate elements of the sculpture.
Overall, this lesson turned out very well. I'm very seriously considering using it again next year!


Monday, June 6, 2016
End of the Year All-Stars
Here's the deal. It's been a long year. At the moment, I'm simply ready for summer. I have quite a few lessons that I was planning on writing posts for, but I'm just not going to get there. What I'll do instead is post some all-star student work from various lessons that I haven't had time to write about. I'll be back to blogging this fall. Enjoy! Happy summer!
This first project is a 5th grade sgraffito mug lesson. Slab mugs topped with black underglaze. Sgraffito done with an underwater motif. Pretty rad. My example is the first image.


5th grade Keith Haring paintings inspired by what is important to each student. Neon paint- oh, yeah!


The next project is the slab castle project by 4th grade.


Anthropomorphic animals by third grade. This project was clear at the end of the year and it was begging for more time. I'll do it a little differently next year. They still turned out really cool.


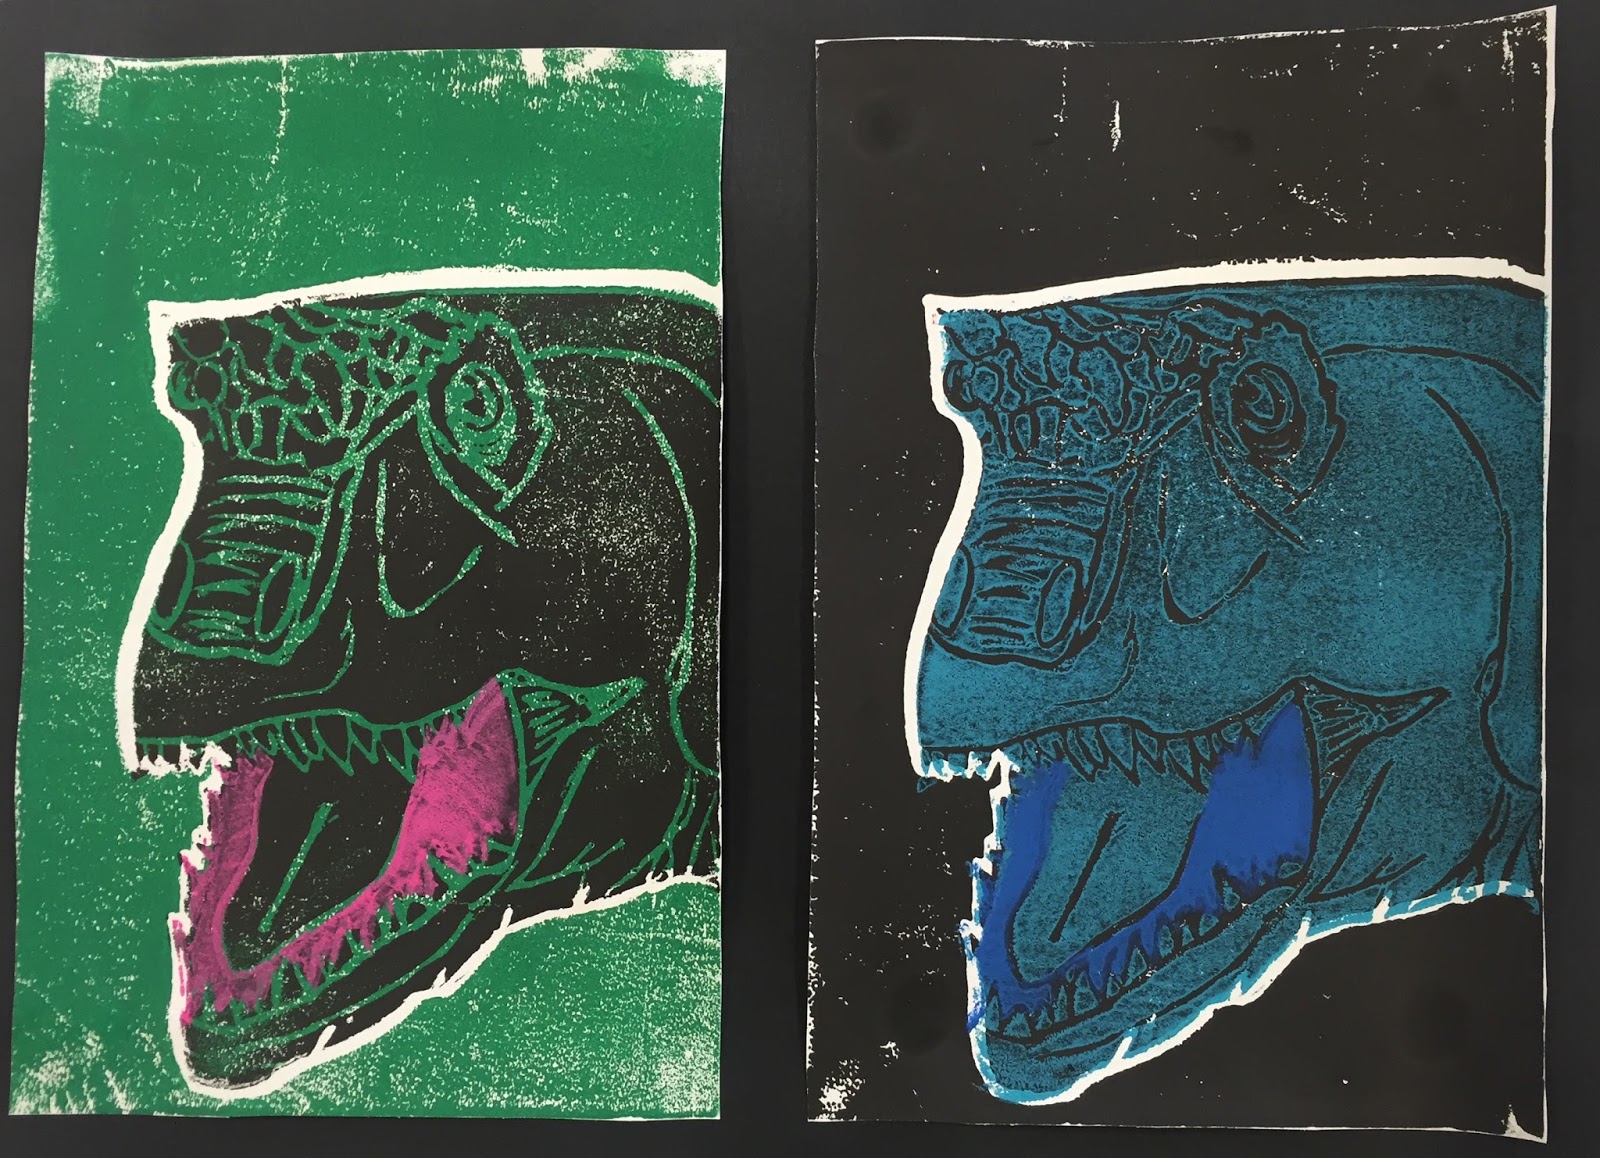
Finally, a fan favorite. 4th grade animal reduction prints. This rock every single year. No exception this year.


This first project is a 5th grade sgraffito mug lesson. Slab mugs topped with black underglaze. Sgraffito done with an underwater motif. Pretty rad. My example is the first image.


2nd Grade clay dinosaurs. Always a winner. Clay with tempera paint.


5th grade Keith Haring paintings inspired by what is important to each student. Neon paint- oh, yeah!


Anthropomorphic animals by third grade. This project was clear at the end of the year and it was begging for more time. I'll do it a little differently next year. They still turned out really cool.


Finally, a fan favorite. 4th grade animal reduction prints. This rock every single year. No exception this year.


Subscribe to:
Posts (Atom)