Instagram

Showing posts with label Printmaking. Show all posts

Monday, August 3, 2015

5th Grade Nature-Based Block Prints

Woohoo! Another printmaking project! This is a new lesson I wrote this past school year when a student teaching project wasn't working out so well. 

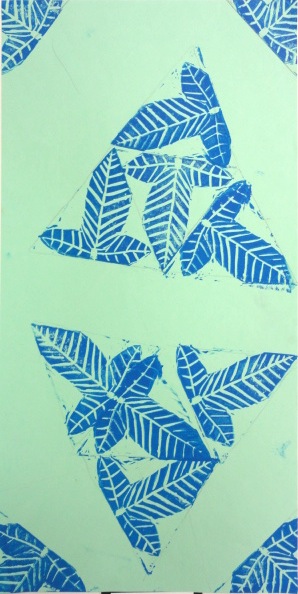
The basis of this project was patterns found in nature. We started out by looking at a bunch of photographs of naturally occurring patterns. If you look for it, there are some pretty astounding patterns and designs on plants and animals. I even brought in some math (gasp!) and talked about the Fibonacci sequence and how it is related to the golden ratio that can often be found in nature. 


An example of the golden ratio in plant form!
Each student then used some reference material to sketch out a few different zoomed in views of natural patterns. The best drawing was then transferred to a piece of EZ-Kut block printing material that I had pre-cut as equilateral triangles. The triangular shape was a definite departure from other printmaking lessons in the past. 

Before they printed, students lightly sketched out where they wanted to print. Most students chose to do a random kind of layout. If I were to change anything about the project next year, I would at least want students to make a symmetrical layout of their final prints - the work that turned out the best used symmetry this year. 


Monday, July 27, 2015

4th Grade Reduction Prints

This project is like magic. The first year I did it, I was absolutely astonished at how well it turned out. It is still my favorite printmaking project that I teach. I usually post 4-8 examples of each project and every year I find myself posting WAY more than that for this lesson. It's just that good. 

I have visual instructions for this project on my original post of this project. The concept here is that students start with a large piece of foam and press in details to print one step at a time. The inks are layered and students eventually wind up with a three color print. 

Andy Warhol is the major inspiration for the lesson. We take a look at various example and talk about how screen printing was Warhol's primary method of art making. It gives the students a good jumping-off point for the lesson. 

Also, before you ask, we use photo reference for the animal drawings. I get a huge stack of animal books from the library and students choose a specific photo or two to draw from. I get way more detailed and realistic work from students this way. 

Enjoy the examples from this year!

Click here to download my lesson plan. 


Monday, July 13, 2015

3rd Grade Collagraph Quote Prints

This is another one of my absolute favorite projects. I'm finding that I really enjoy lessons that are different from the usual painting/drawing norm. I work really hard to make sure I have a ceramic lesson as well as a printmaking lesson for each grade level every single year. 

This lesson was one of the last printmaking lessons I added into my curriculum. I was inspired by a middle school project over at The Calvert Canvas Blog and I adapted that idea to my 3rd grade students with a few minor changes. 


The boards are ready to go!
Each student chooses a favorite quote- either from a list I have or they may use one they already know. They then do several sketches and a peer review while they work out different ways of designing their text. After the final design is decided, students draw their quote on a piece of thin foam. They cut out their letters, then glue them backwards (with the help of a mirror) to a piece of chip board. They then use ink and brayers in order to print on a piece of construction paper. I always have my students make several prints in order to make sure they get at least one really nice finished print. 

Click here to download my lesson plan!


Monday, February 9, 2015

2nd Grade Wild Things Printmaking

I wish I had more time in college. There were so many courses I wanted to take when I was in school, but there just wasn't enough time. I never took any printmaking classes. I really enjoy printmaking now and I made it a point last year to make sure I have a good printmaking lesson for each grade level. I wound up presenting about my printmaking curriculum at the AOE summer conference last year.
This is a project I've done for the past several years. My friend Drew Jones, another elementary art teacher in my district, wrote this lesson a while back. Since Drew is a cool dude, he shared it with me. 
This project uses the simple styrofoam printmaking material. After reading Where The Wild Things Are, each student does a ton of sketches in order to design their own original wild thing. The best one is pressed into the foam. Printing takes place over the course of two classes and the project is finished by mounting the prints on black paper and adding some words with construction paper crayons. It's a winner every year!
 

Click here to download the full lesson plan. 

Thursday, July 17, 2014

5th Grade Radial Printmaking


I'm writing this post as I'm attending the AOE Online Conference and drinking a delicious iced cappuccino. How's that for multi-tasking? 

This lesson is a new one for me this year. It is one I included in my presentation on building a printmaking curriculum for the AOE conference. For this lesson, I introduced my students to block printing using E-Z-Cut printing blocks. This material is available in several different names, and essentially replaces linoleum blocks for younger students. I used linoleum blocks in middle and high school and they required a lino cutter tool and bench hook. I remember several students who gauged fingers (and got at least a few stitches) because traditional linoleum is kind of tough to carve. E-Z-Cut is super soft and doesn't require a bench hook. It is incredibly easy to carve and makes this type of printmaking completely feasible for an upper elementary project. 

The secondary idea behind this lesson was radial design. I showed my students how to sketch out a design that would work as a quarter of a radial image. We used some Celtic knots as inspiration (although some students went in their own direction) and got to work with some sketches before drawing out the finished design on a 4"x4" piece of E-Z-Cut. Students carved with a lino cutter tool (always carving away from their hand/body) and were ready to print. They drew an arrow pointing to the center of their design on the back of their printing block to make it a little easier to print the final design. 

I was really impressed with the results of this project. It kept my 5th graders completely engaged even at the very end of the school year. If you teach 5th graders, you understand how impressive that is!

Click here to download my lesson plan for this project!