Instagram

Thursday, April 4, 2013

3rd Grade Machine Brains

 This is one of my favorite projects of the entire year for any grade level. It consists of massive integration of the science curriculum into the art room. I've always really enjoyed science, so maybe that's part of the reason why I enjoy this project so much. The point of it is to design a machine that has at least eight steps that does something that naturally occurs in a person's head. 

We always start this project by checking out a few of Rube Goldberg's hilarious machine cartoons. My students always get a big kick out of his work and it gets them thinking about the possibilities for their own projects. 

 Next, we talk about the six different simple machines and take a look at examples of each. Finally, we look at a few videos of Rube Goldberg style machines that people have actually built and put on YouTube. My favorite is a music video by OK GO. My students go nuts over this video.

 Finally, it's time to actually do some artwork. It takes a couple of weeks to brainstorm and get sketches finalized. It sounds like a lot of time, but it really does take that amount of time to do a couple drafts in order to ensure that the machines make sense. Final art is done on a 12"x18" white paper. I trace each student's silhouette during the sketching phase so it is ready to go when they begin their final. All of the machine parts are made with scrap construction paper. Huzzah for science and art!

Check out the full lesson plan here.

Click here for access to the presentation I use to begin this project.
(Download the presentation from Google Drive to use it. It will download as a Quicktime file that can be used on both Mac and PC. You will be able to navigate through using the arrow keys on the keyboard.) 

Tuesday, April 2, 2013

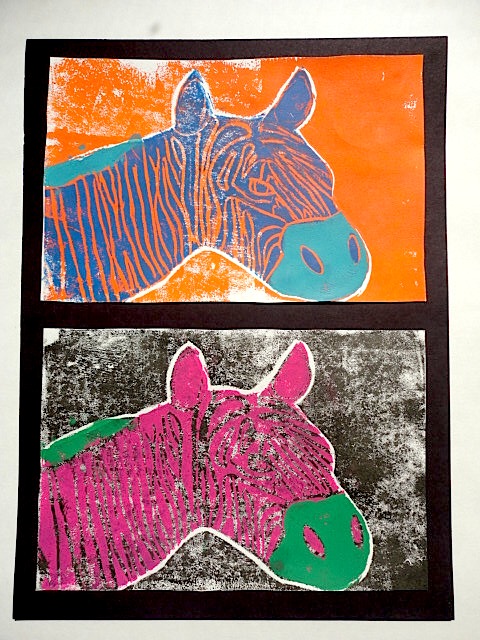
4th Grade Animal Printmaking (The best printmaking project I have ever done!)

Let me start out by saying this has been one of the most successful and visually stunning projects that I've ever done with my students. It is definitely the most exciting printmaking project that we've ever done at Thomas. I wrote the lesson and went into the project thinking that it would probably be pretty good. I told my students that I'm absolutely blown away by the results of their talent and hard work. This lesson is a keeper. 

My previous 4th grade printmaking lesson was decent, but not outstanding. It was too similar from an art-making perspective to the Wild Things I do with my 2nd graders. This year, I really wanted to push the medium a little more by printing with multiple colors. I ended up deciding to push it to three colors and add in a little vocab by also bringing in the use of complimentary colors. 

Check out the lesson plan here!
Close up of the piece above. Wow. 
Whew. That was a lot of examples, right? I just couldn't help myself this time. They were all so good that I had to show them off. If you're still reading, you're in luck. I'm going to tell you how I did this project and I'm going to use pictures! Let your inner kid rejoice.
Start with a drawing of whatever you want to print. I had my kids do animal portraits. I gave them each a piece of the foam they would be printing on, then had them trace around it to give them the size of the final artwork. I then collected the foam for use the following week.
Tape your drawing over the printing foam and use a dull pencil or other blunt tool to press
down on the lines of just the outline of the subject. Take the paper off and press down
again to make sure the marks are deep enough to make proper prints. I had my students make sure they ended up with three good prints of the background on the first day of printing.
Re-tape the original drawing the following class. Press down any remaining details. Cut out the subject along the line that was pressed down last time. Now print with this piece directly on top of the original prints. I had my students use at least one set of complimentary colors.
On the final day of printing, cut out a small detail that makes sense to print in a
third color. Then, you guessed it, print this piece right on top of the original prints.
This was my demo piece I did with the materials above.

Thursday, March 21, 2013

Monsters Don't Like Broccoli Multimedia by 1st Graders

There are activities that I'm sure carry over to all kids in all art classes throughout the entire world. One of those things is that first graders go absolutely NUTS for oil pastel resist with watercolor. I'm absolutely certain of it.To a first grader pastel resist is some form of magic. That's pretty cool to me. 

This project is based on the book Monsters Don't Eat Broccoli  by Barbara Jean Hicks. Obviously we all know that monsters don't eat broccoli. It's a well-documented fact.

For this project, my students created a oil pastel resist city background and a monster on a separate piece of construction paper. We added some cool textures/patterns with some simple printmaking with caps and pieces of cardboard. The last step was for students to pick out which food they like the least and make it with construction paper. It was pretty interesting and funny to see what first graders don't like to eat. 

Check out the lesson plan here!


Monday, March 18, 2013

2nd Grade Henna Hands


I wrote this lesson about a year ago and this is the second time I've used it with my second grade students. It's a relatively quick project and it allows students to explore art from India. My school has a large Indian population, so this is an extremely popular project. 


Friday, March 8, 2013

Thomas Elementary Logo Design Contest

This is a post strictly for my Thomas Elementary students. The rest of you can feel free to read it, too. I just can't promise that it will be as life-altering as my posts usually are. As part of the celebration of the 25th anniversary of Thomas, we will be redesigning our tiger logo.  

The Thomas Elementary logo design contest is on like Donkey Kong. The contest is open to all Thomas students in PK-5th grade. Students can work in groups, turn in multiple designs, or choose not to participate at all. 

Helpful Hints for Logo Designers:

  • The logo must represent the Thomas Tigers.
  • The logo should look very different than our current logo.
  • Please do not include words.
  • Research current sports/school logos for inspiration.
  • Your logo should be entirely original.
  • Simple logos are usually stronger than those that are complicated.
  • Contest entries are due to your classroom teacher or Mr. Stoller by April 1st. 

If you need an additional copy of the entry form, click here to print a new one.