Instagram

Monday, August 29, 2011

Pinterest!

I really enjoy checking out a lot of the other art teacher blogs that are out there. There are a ton of really talented and dedicated teachers who post some amazing projects. I'll see a project I really like and I'll drag the link into a folder I keep on my computer labeled "Project Ideas." Unfortunately, I get so busy sometimes that I don't go back to check that folder often enough. Another art teacher in my district told me about Pinterest earlier this fall. My wife, a graphic designer, had been using Pinterest for several months, so I was familiar with how it worked. What I didn't realize is how many cool art projects are on there!

If you aren't familiar with how Pinterest works, here is a quick rundown of the site. Anyone can "pin" images on the internet. If I find a really cool project on somebody's blog, I can pin it on a board in Pinterest. The image is saved in a visual file essentially. It is super easy to scroll through and find particular images which are also linked back to the original web page they were found on. People can also "re-pin" images already on Pinterest. There are quite a few art teachers already pinning, so I am able to search for art lessons and re-pin them to my elementary art board. I highly recommend checking out the site. 


Wednesday, August 24, 2011

The room is ready!

The time has come. School starts bright and early tomorrow morning. I think pretty much everything is in place for another school year. I always enjoy seeing pictures of other teacher's rooms when I look at their blogs, so I'm going to put up a few pictures from my room. If nothing else, I can look back fondly in a few weeks and reminisce about how clean and shiny everything is. 


I made a few changes to my room this year. I dedicated my main bulletin board wall to information about what each grade level is studying. In the past, I have always put up prints and changed out a few as the year went along. I purchased a bunch of vocabulary cards at the end of the year last year that I think will work really well on new bulletin board. 


Another change this year has to do with this blog. I'm going to try my best to attach lesson plan files to each new post. Hopefully this is helpful to people who read the blog. If there are any other requests for things you'd like to see on here, comment and let me know! Happy 2011-2012 everyone!


Newest Bottle Cap Art Installed!


When we do bottle cap art at Thomas, we go big. If you are a regular reader of this blog, you may recall that my 4th Grade students created a new bottle cap mural last year specifically for the library. Here is a link to the original post. The mural was installed over the summer and it looks great! I thought I would post a few pictures of the finished piece.

Friday, May 27, 2011

5th Grade Tiki Mugs

I think this will be the last official post of the school year!  Today is the last day of the year!  I feel like I've done a pretty good job of posting examples of almost every single project that my students have worked on this year.  This last project was fun, if not a little rushed.  My 5th grade students created mugs in a Tiki style. Some kids decided to add handles, but many just decided to carve their tiki faces into the clay.  This was a fun project and my 5th graders absolutely love the fact that they can actually use their mugs to drink out of.  


I hope everyone has a great summer.  I'm planning a few upgrades to the blog over the summer that I think will be pretty successful.  I'm going to try to actually post my lesson plans for each project along with images.  Hopefully that is helpful to those of you out there who get ideas from this blog.  


What a cool handle!


4th Grade Flip Books

I have found that doing flip books at the end of the year with 4th grade is absolutely perfect.  The kids really love the project and it is something that can be lengthened or shortened based on the crazy schedule at the end of the year.  It is a good introduction to animation and I have found it helps my 5th graders better understand animation concepts when they film their claymation.  

Friday, May 20, 2011

Thomas Elementary Art Show

The art show!  The event we have been working hard the entire year for!  The art show this year was incredibly successful.  Each student had at least one piece of artwork in the show, but most had 2 or even 3.  The art show is the official unveiling of the new bottle cap mural as well as the premier of the 5th grade claymation film.  I am lucky to have such supportive parents and staff at Thomas.  The show was very well attended and everyone had a great time.  Thanks to PTO parents and volunteers for helping out and providing cookies and punch.  I also want to thank my wife, Heather, for taking a vacation day from work to spend the day helping me out!  


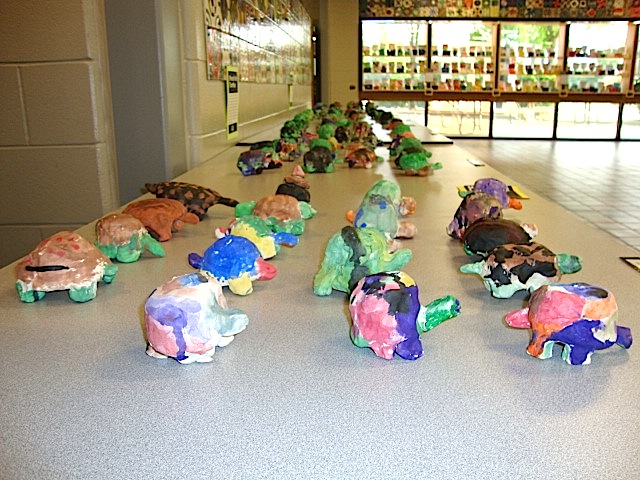
1st Grade Clay Turtles


1st graders recently finished making clay turtles.  This is the first clay project most of them have worked on, so it is relatively simple.  I have kids make them in two days, although it would potentially be possible to finish them in one.  The first day, students make a simple pinch pot.  On day two, they add legs, a head, and a tail.  Once they are fired, the turtles are painted with watercolor.  A few legs and heads tend to fall off, but it isn't something a little hot glue can't fix!

4th Grade Bottle Cap Mural

This project seems to be a favorite among students, parents, and blog readers.  This is the third year in a row the 4th grade has created a bottle cap mural for permanent display in the school.  The previous two have gone in separate stairwells, but this mural will be placed in four side-by-side windows in the library.  This year, students decided to make Dr. Seuss characters and spell out the word 'READ' on the mural.

In the past, I've gotten a many questions about how this process is done, so I'll describe it in more detail this year.  Of course, if anyone has questions, please feel free to post a question in the comments area or email me directly.  The work is all inspired by Michelle Stitzlein, a local artist who works with school groups and has quite an impressive collection of her own fine art work.  She focuses on the use of recycled materials in her art.
First, the boards are primed with a latex primer.  The design is then drawn out with sharpie and the whole mural is painted with either latex or acrylic paints.  This gives the mural a base color and allows for some spaces to stand alone without caps if need be.  Sharpie is again used to clean up edges and define colors.  The next part can be done a couple of different ways.  I know some people like to do all the caps at one time and bring in parent volunteers with cordless drills to help out.  I like working on it gradually.  I just have the kids carefully hot glue the caps on the boards then I put screws into the caps later on.  I use these screws.  To give an idea of how many to buy, I used right around 2000 screws for the mural this year.


4th Grade Chinese Dragons

 This project was a new one for this school year.  We studied dragons and their significance in China.  Students learned that, in China, dragons are not feared.  Chinese people believe that dragons represent wisdom, power, and luck.  Chinese dragons are typically long and thin and do not have wings.  Each student drew their own dragon and painted it with watercolors.  These were then carefully cut out and mounted on a piece of construction paper.  These were then cut out again, leaving a border of the color their dragon was just glued on.  The dragons were then mounted onto another color of construction paper.  The project was finished by students writing descriptions of their dragons in actual Chinese characters.  

5th Grade Claymation


This is the giant, culminating project for 5th graders.  Claymation!  It takes about one third of the year to complete, but the students absolutely love making it.  This year, we chose to animate many of the art room rules.  Feel free to use the video in your classrooms if you'd like.  


My students write the scripts (can you tell?), create the characters, build the sets, and voice the characters.  All students chose one job and then work with their specific group for many art classes in order to get the claymation ready to film.  Once filming is ready, I have one table film each day while the other classes work on a separate project.  Each table gets to film one day.  Once all of the filming is done, I edit it all together in iMovie and have the students do voices for the characters.  I always post the final video on YouTube so the students can watch it at home whenever they want.  Note: If YouTube is blocked at your school, the video will not work.