Instagram

Thursday, April 26, 2012

4th Grade Clay Castles & Coat of Arms

Wow. Beautiful design! 
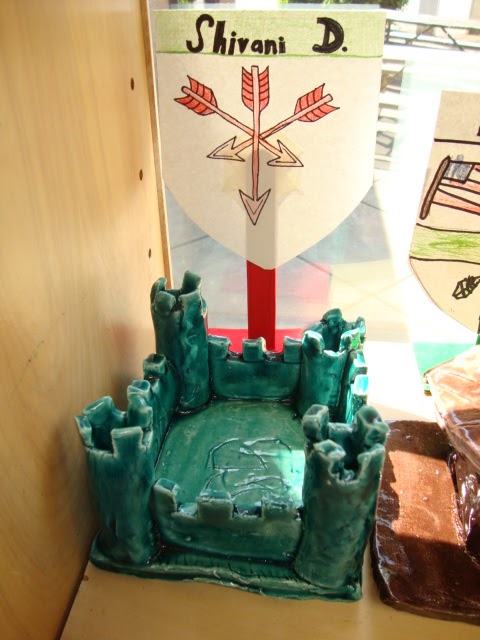
I love clay. If I could do clay projects all year I would seriously think about it. I tend to schedule my clay projects toward the end of the year because it is convenient to have everything at school for the art show. This project is one that I tried out during student teaching many years ago and have continued because my students enjoy it so much. 


We study castles from all over the world and each student designs their own castle. Using a slab building technique, they spend about five classes building their castles, adding details, and glazing. Last year, I decided to have each student make a small coat of arms while we were waiting for the castles to dry and be bisque fired. In addition to looking really cool, the coat of arms also serve as a name tag for the castles at the art show. All of the lower grades constantly ask about when they get to make clay castles. First graders are really bummed out that they have to wait for so long! 


Here is the lesson plan!


Monday, April 23, 2012

1st Grade Dancing Giraffes

This is probably about the fourth time I've done this project with my 1st graders, but it always turns out so cool so I keep doing it. This project is based on the book Giraffes Can't Dance by Giles Andreae. 


This project has two parts that I really enjoy. First, the kids love making the backgrounds. I show them how to do a little wet on wet painting to make their moon "glow." I also have them layer some green over a dried layer of yellow before scraping off some of the green with the back of their brush. Making the grass this way during the demo always gets a nice little collective gasp of surprise from my classes. The second part I really enjoy is the personality of the giraffes that the kids come up with. I try to give them as much freedom as possible and I get some really good results.


Check out the lesson plan here!

Tuesday, April 17, 2012

2nd Grade Eric Carle Style Animals


My 2nd grade students just finished a project about Eric Carle. I've always liked Carle's books and my students all know who he is. I started this one out by reading one of Carle's many books to my classes. They then sketched a simple picture with an animal as the main focus. On the second day of the project, each student created two textured papers that could be used in their project. They were able to use all kinds of unconventional tools to paint with to make some really cool textures. On day three, students began cutting up their textured paper in order to make a collage. It took one more day to add details and write artists statements. 


This project came out fairly good, but I think I'll end up changing it around a little next year. I think my students would be more successful if they were just doing one large animal  and no or very little background. Many students ended up making their animals so small they couldn't really get any details in. Of course it's not like I told them over and over to make sure they made their animals as big as they could. Wait...I did tell them that!


Unfortunately, I don't have a digital copy of this lesson. Usually, I would have time to type something up and post it. Right now, I have my art show coming up in just a few weeks and there are more pressing matters going on right now! Please let me know if you have any questions. This project is pretty straight forward. 

Thursday, April 5, 2012

3rd Grade Recycled Magazine Bowls

It feels like it's been quite a while since I last posted! Between spring break and being in the middle of some long projects, I haven't had a lot to post about until now. 


I've always been a big proponent of being green in the art room. I try to incorporate recycling into as many projects as I can. I've even wearing a shirt with the recycling symbol (and a narwhal!) right at this very moment! I think any time you can help students understand the reasons behind why being green is important, it is a high quality addition to a lesson. 


Over the last couple of years I have played with the thickness of the magazines for this project. I've figured that 3/4" is just about perfect for my 3rd graders. I cut strips of chip board for my students to wrap their magazine pages around. They all end up doing around 50 pages before attaching them all together and rolling them into a disk. This project is pretty consistently successful and I recommend it if you're looking for something fun, green, and inexpensive!


Check out the lesson here!

Tuesday, March 27, 2012

Spring Break & Firing Castles

I haven't posted in a little while because last week was my spring break! While many other teachers traveled to Florida or other warm vacation spots, I hung out at home in beautiful Columbus, Ohio! Luckily, it was in the mid-80's for most of the week. I think the normal highs for this time of the year are in the upper 50's! I was able to get a lot of yard work done and still have time to relax on the deck I built last year. 


Of course I've jumped back into my regular routine again this week. I still have many projects that need to be finished before my spring art show. Spring always seems like it's the busiest time of the year. It's always an all-out sprint between spring break and my show. Right now, 4th grade is finishing slap-built castles. I'm in the process of firing them now. 

Monday, March 19, 2012

3rd Grade Roy Lichtenstein Portraits

I think this will be the last of my student teacher's projects that I will be posting this year because she finished her time at Thomas last Friday. Thinking back on it, I probably should have given her the opportunity to write the blogs posts about her projects, but I really didn't want to overwhelm her. 


This project was designed around students learning how to draw self portraits. I usually do a self portrait project with my third graders, so it fit in very well. Students studied the pop art work of Roy Lichtenstein and discussed his simplified use of color. After using mirrors to draw themselves, students used bubble wrap to print Benday dots on their portrait drawings. The final step was to cut out their portraits, mount them on black paper, then make action words to go along with the image. 


I think the idea of this project was more exciting than the final outcome. I was a little disappointed with how the bubble wrap printing. My students had a tendency to smear the dots a little. If I would do this project again, I might just use one large piece of bubble wrap for the whole face and not worry about doing multiple colors. Some students who were absent also had pretty good success using colored pencil to make their Benday dots. 

Thursday, March 15, 2012

Illustrator and Author Loren Long Visits Thomas!

Last week, Thomas Elementary was lucky enough to host author and illustrator Loren Long! Long lives in Cincinnati and came up to Columbus for three days to visit schools in the district. In my time as a teacher, I have seen many people and organizations come in to the school to give presentations and performances for the students here. Loren Long was the best I have seen so far.
The kids were totally captivated while watching Loren draw Otis the tractor.
If you don't know of Loren Long, you should! He started out in the book world as an illustrator. He and I had a good conversation during lunch and it turns out that we know several of the same people in the illustration world. I graduated from CCAD as an illustration major back in 2004. Long's work includes illustrating children's books written by Angela Johnson, Madonna, and President Obama. You may have heard of them before! He has also written and illustrated several books, with the Otis series being the most well known.
Loren did an amazing job with the students here and kept them extremely interested and entertained. It was refreshing to hear him talking about why people should draw lightly when they are making artwork. I've only said it thousands of times, but having a real illustrator tell the kids can't hurt!

Tuesday, March 13, 2012

1st Grade Cave Drawings

This is a project that is art show worthy! First grade classes just finished a project in which they studied cave paintings from Lascaux in France. My kids loved going on a virtual tour of Lascaux. People aren't allowed to enter the caves anymore due to the artwork being destroyed more in the few years the caves were open than the 17,000 years before they were discovered!


I don't have a digital copy of this lesson, so I'm going to describe the project a little more than usual. With this project, students started off with craft paper that was roughly torn from a big roll. I've seen other teachers use paper grocery bags as well. The students crumple the paper and carefully uncrumple it. They then use an acrylic gloss medium to cover the paper.


The second day of the project, students practice drawing various cave animals from a handout I made. After practicing, they drew their favorite animal on the paper with pencil. The pencil doesn't show up very well, so they immediately go over the pencil lines with black oil pastel to make it show up better.
Some kids worked on the cave "walls" and
some worked on the floor instead.
The third day of the project is the coolest. My student teacher was running this project and it was pretty necessary to have two adults for this portion of the project. Essentially, we turned the room into a cave. All of the tables were turned on their sides and faced inward. We put a fake Halloween prop fire in the middle of the room and turned off all of the lights. First graders had this last day to add a bit of limited color to their cave animals and then make a white hand print to "sign" their work. They could choose to work on the cave "wall" or on the floor. This is one of those projects that is successful across the board. I'm planning on turning the stage at school into a "cave" for the art show. I saw the idea on Pinterest and I think it will look outstanding.

Friday, March 9, 2012

2nd Grade Butterfly Lifecycles

Want to amaze and astonish your colleagues and principal? Want to look more rad than you already do? Integrate other academic subjects into your art curriculum!!! Yeah, I know we all pretty much do this already, whether other staff notice or not. It's something I enjoy doing anyway because I really enjoy science and social studies. 


This is a project that Mrs. Heimlich, my student teacher, came up with. She started out talking about the life cycle of a butterfly and reading a book to the students that described each part of the cycle. Student then chose one of four native Ohio butterflies (Monarch, Tiger Swallowtail, Buckeye & Painted Lady) to sketch. They then created the caterpillar and butterfly body out of clay. While the clay was drying and being fired, students created textured paper (Eric Carle style) with the colors of the wings of their chosen butterfly. With the scraps from the butterfly paper, students made a chrysalis by taking a small scrap and wrapping it with wax paper. They then taped the chrysalis to a real stick. Everything was then mounted to a piece of railroad board. My only concern about this project is hanging it in the hallway. The clay pieces are hot glued and tied on with fishing wire, but I don't trust over 600 kids rushing around in the hallways not to send random butterfly parts crashing to the floor and shattering. I prefer to avoid art related tears whenever possible. 


For once, I don't have an electronic version of this lesson plan. Mrs. Heimlich gave me a paper copy to check out before she taught, but I don't have the digital file. It's pretty self explanatory, so I'm sure you super smart art teachers can figure out how to teach it if you want to do so. 

Monday, March 5, 2012

1st Grade Klimt Trees

This is one of the last couple projects that I'll be posting that my student teacher came up with. I thought that this particular project was pretty successful all around. 


The kids started out by looking at some examples of the work of Gustav Klimt. They discussed Klimt's work and talked about how he used a lot of pattern in his work. Mrs. Heimlich then focused more directly on Klimt's painting Tree of Life. 
Tree of Life by Gustav Klimt
Students then practiced drawing trees in Klimt's swirly style. To make the "leaves," students dipped bottle caps of various sizes into tempera paint and did some simple printmaking with them. I hadn't ever done any printmaking with 1st grade before, so this was a great introduction to the concept. The last step of the project was making a small bird to go in the tree to match the one in Klimt's painting. If I were to do this project again, I would probably use a lighter color paper so the tree itself would stand out a little more. 


See the lesson plan here!